Why Understanding the Solar Installation Process Matters
Understanding the solar panel installation process is key before making this important investment. Here’s a quick overview:
The Complete Solar Installation Timeline:
- Planning & Design (2-4 weeks) – Site assessment, system sizing, and component selection
- Permitting (2-8 weeks) – Building permits, utility applications, and approvals
- Installation (1-3 days) – Physical mounting, wiring, and system setup
- Inspections (1-2 weeks) – Safety checks and utility approval
- Activation – Permission to Operate and system energization
Total timeline: 2-3 months from contract signing to flipping the switch
Solar power is one of the fastest-growing energy solutions in the U.S., offering San Diego County homeowners a chance to cut energy costs and boost home value. With an average industry growth of 49% over the last decade, new installations can pay for themselves in as little as five years, and homes with solar panels sell for an average premium of $15,000.
Many homeowners don’t realize the rooftop work is just one part of the journey. The full process involves careful planning, engineering, permitting, and inspections. Understanding each phase helps set realistic expectations and ensures a smooth process, whether your goal is saving money or being more eco-friendly.

Phase 1: Planning Your Solar Journey

This first phase of the solar panel installation process is about understanding your home, energy habits, and goals to design the perfect solar system for you.
Your journey starts with a consultation to discuss your electricity bills, daily routines, and future plans like an EV or a pool. These details are crucial for designing a system that will serve you for 25+ years.
During the site assessment, our technicians check your roof’s age and condition, as well as your electrical panel, which may need an upgrade to safely handle the new system. We also conduct a detailed shading analysis, as even small shadows from trees can impact performance.
Roof suitability is key. While south-facing roofs are ideal, we can design effective systems for east and west-facing roofs, too. Our team uses sophisticated software for system design, creating a custom layout that maximizes your solar potential.
The entire project typically takes 2-3 months from contract to activation. While the installation is quick, the planning, permitting, and approval process ensures it’s done right. While we handle the engineering, you can explore your home’s potential with the PVWatts tool for energy estimates.
Designing Your System and Choosing Components
Once we understand your needs, we design your custom solar system.
System size calculation is custom to match your energy consumption, aiming to offset most or all of your electricity costs. With net metering, we can even design a system that earns you credits for excess energy production.
We’ll guide you through panel types, like efficient monocrystalline panels, and explain the best options for your home. Inverter technology is also crucial for converting DC power from your panels to usable AC power. We’ll recommend the right technology—string inverters, microinverters, or power optimizers—based on your roof and shading conditions.
Solar battery considerations are increasingly popular. Batteries store excess energy for use at night or during outages, providing energy independence and peace of mind. Our component selection process ensures every piece of your system, from panels to wiring, works together perfectly. We bring the expertise from our Solar Energy Systems El Cajon installations to homes throughout San Diego County. You can learn more from the Database of solar panels and components.
Financing and Incentives
While the upfront cost of solar can seem daunting, costs have dropped significantly, and more financing options and incentives are available than ever before.
You have several paths to ownership. Cash purchases offer the fastest payback. Solar loans allow ownership without a large upfront payment. With solar leases and Power Purchase Agreements (PPAs), a third party owns the system, and you pay for the power at a reduced rate.
The Federal Solar Investment Tax Credit (ITC) is a major incentive, offering a 30% tax credit on solar panels and battery storage through 2033, thanks to the Inflation Reduction Act benefits. This can mean an average savings of around $9,000.
State and local rebates, which we can help you find, can add to your savings. The DSIRE database for incentives is a great resource for exploring available programs.
With an average payback period of 5-8 years and an average home value increase of around $15,000, solar is a smart investment. We’ll crunch the numbers with you to show how it pays off over time.
Phase 2: The Complete Solar Panel Installation Process
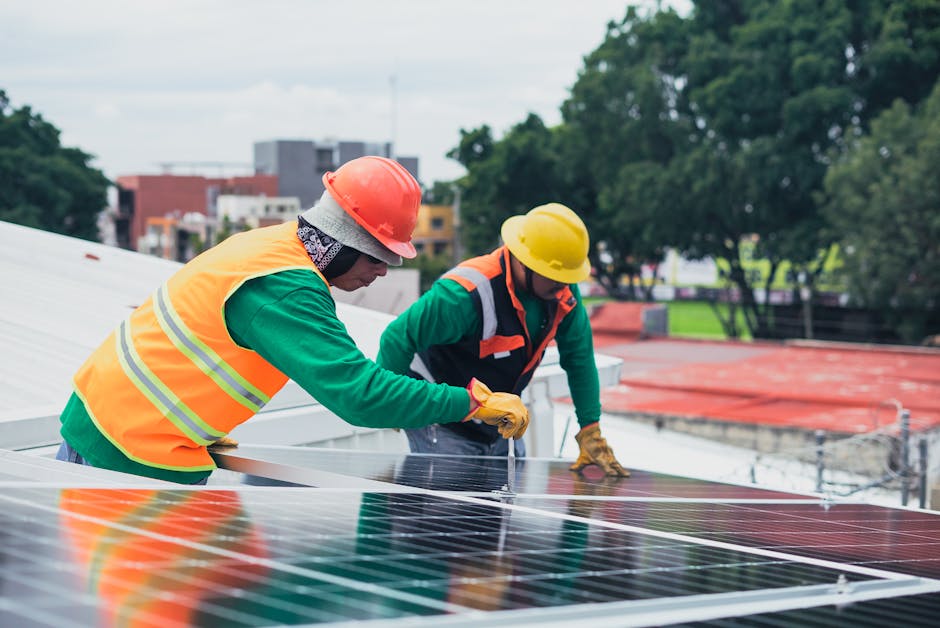
With planning complete, we begin the hands-on phase: the actual solar panel installation process. This technical stage is the quickest part of the journey, usually taking just one to three days, and requires precision and a commitment to safety.
Our professional installers are highly qualified. Many hold certifications from organizations like NABCEP (North American Board of Certified Energy Practitioners), the industry standard, ensuring they can handle high-voltage electricity and complex installations safely. You can learn more about the Benefits of professional certification for solar installers.
Safety is paramount. Our team uses strict protocols, including scaffolding, fall protection like harnesses, and safety lines. Electrical safety is non-negotiable, and we minimize disruption by only turning off your power for about an hour to make the final connection.
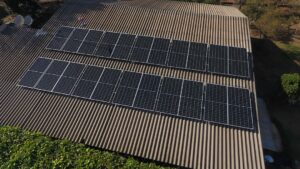
Step 1: Preparing the Roof and Mounting System
First, we prepare your roof, conducting a final structural integrity check to ensure it can support the solar array. Any necessary minor repairs are done at this stage.
Next, we install the mounting system, chosen based on your roof and property. Options include:
- Rooftop mounts: The most common type, attached directly to your roof’s rafters.
- Ground mounts: Ideal for unsuitable roofs or if you have ample yard space.
- Pole mounts: Lifts panels on a single pole for optimal sun exposure.
For rooftop mounts, we use flashings and clamps to create a watertight seal, preventing leaks. Then, we install the racking—parallel aluminum bars that form the framework for your panels. We handle all aspects of Solar Roof Panel Installation Escondido for a secure setup.
Step 2: Panel and Inverter Installation
With the mounting system in place, we carefully position and secure each solar panel onto the racking. We ensure proper spacing and alignment for a clean, efficient array, always handling panels with care to protect their integrity.
Next is the inverter installation. The inverter’s function is to convert the direct current (DC) electricity from your panels into the usable alternating current (AC) electricity for your home. Proper inverter placement is crucial for efficiency. We install them in cool, well-ventilated areas like a garage or protected external location. As experts in Solar Inverter Poway, we ensure optimal performance.
If you’ve chosen a solar battery, we connect it to the inverter at this stage. This allows you to store excess energy for use during outages or at night. We follow the highest safety standards, like Publicly Available Specification (PAS) 63100 for battery safety, for a secure installation.
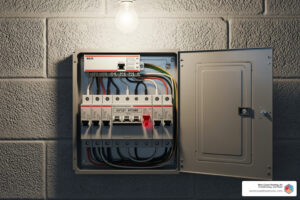
Step 3: Electrical Wiring and Connections
This is the most critical part of the solar panel installation process, handled with precision by our certified electricians. Our team wires the panels together in either a series or parallel configuration, depending on the system design, to ensure efficient power generation.
We then run conduit to house and protect the wiring, which runs from the array to the inverter and then to your main electrical panel. We conceal cables where possible and manage cable length to prevent power loss and ensure safety.
Connecting the inverter to your main electrical panel integrates the solar system with your home. This involves installing a backfeed breaker, allowing solar electricity to power your home and send excess back to the grid.
Proper grounding the system is non-negotiable for safety. It protects against electric shock, fire, and power surges. Our electricians ensure all components are correctly grounded. Finally, we perform comprehensive system safety checks. You can watch a SolarEdge’s HD-Wave solar panel installation video to get a visual sense of the process.
Phase 3: Finalizing Your System: Inspections, Permits, and Grid Connection

Your new solar panels are installed, but before you can enjoy the savings, we must complete the final chapter of the solar panel installation process: official approvals and grid connection. This phase involves final paperwork and safety checks that are essential for safety and legal compliance.
The permitting process is often the longest part of the journey, taking two to eight weeks depending on your location. The good news is we handle all the paperwork for you. We secure all necessary building and electrical permits, steer local requirements, and handle HOA approvals. Our team knows San Diego County’s rules, as detailed in Getting Started with Solar Photovoltaic – County of San Diego, and we manage the entire application process for you.
After installation, final inspections are required. The Authority Having Jurisdiction (AHJ) inspection, conducted by a city or county inspector, verifies that your system meets all local building and electrical codes. Next is the utility company inspection (usually SDG&E in San Diego). They ensure your system can safely connect to the grid and will install a new bi-directional meter to track the two-way flow of electricity.
Net Metering and System Activation
With inspections complete, it’s time for grid connection and activation, where net metering comes into play.
Net metering allows you to send surplus solar energy back to the grid for credits. You can then use these credits to draw power from the grid when your panels aren’t producing enough, like at night. This system maximizes your solar investment. Policies vary by utility, and we’ll explain how it works for you. For more details, see this Information on net metering.
The final step is applying for interconnection. Your utility reviews the inspection reports and issues a Permission to Operate (PTO) letter, officially approving your system for grid connection.
Flipping the switch is the final, exciting step. We’ll be there to activate your system and walk you through system commissioning. During commissioning, we verify system performance and help you set up your monitoring system performance tools, usually via a smartphone app, so you can watch your home generate its own clean energy.
From this moment forward, you’re officially a solar-powered homeowner. Welcome to the solar family!
Phase 4: Maximizing Your Investment: Maintenance, Value, and Smart Choices

Congratulations on completing the solar panel installation process! Your solar journey is just beginning, and the best benefits are still to come.
The long-term benefits go beyond monthly savings. You’ve hedged against rising utility rates and increased your home’s value. According to a Recent study on solar home premiums, solar homes sell for an average premium of $15,000. With solar panels last 25+ years, your investment pays dividends for decades.
Ongoing Maintenance and Upkeep
The good news is that solar panels are remarkably low-maintenance. However, a little care goes a long way.
- Panel cleaning: In San Diego’s dry climate, dust can reduce efficiency. A simple rinse with a garden hose every few months is usually enough. Clean when panels are cool and avoid abrasive tools.
- System monitoring: Use your monitoring app to track energy production. A sudden drop could signal an issue.
- Professional inspections: Schedule an inspection every few years to ensure peak performance. Our team offers Solar Panel Maintenance Services Santee to check connections, racking, and inverter efficiency.
Understanding your warranty information is also important. Panels typically have 25-year warranties. The inverter lifespan is about 10-15 years, and the battery lifespan is 10-12 years. These are predictable maintenance costs far outweighed by your energy savings.
Common Mistakes to Avoid During the Solar Panel Installation Process
Learning from common mistakes can save you time and money.
- Not getting multiple quotes: Compare offers to understand pricing, design, and service levels. The cheapest quote isn’t always the best value.
- Choosing an uncertified installer: This can lead to botched installations. Verify your installer is certified, insured, and has a local track record. We’ve been serving San Diego since 1996 and stand by our work.
- Underestimating energy needs: Consider future plans like an EV or a pool when sizing your system. It’s cheaper to install a larger system upfront than to add panels later.
- Ignoring roof condition: If your roof needs replacing soon, do it before installing panels to avoid the high cost of removal and reinstallation later.
- Misunderstanding financing terms: Read the fine print on any financing agreement. Understand all terms, who owns the system, and who gets the tax credits.
- Falling for scams: Be wary of high-pressure tactics or deals that seem too good to be true. Reputable companies don’t rush you. The Consumer advisory on avoiding solar scams offers good advice.
By avoiding these pitfalls, you’ll enjoy decades of clean, affordable energy.
Frequently Asked Questions about Solar Installation
Here are some of the most common questions we hear from homeowners considering solar.
How long does the entire solar installation process take?
The full timeline from contract to activation is typically two to three months. The physical installation is quick, usually just one to three days. The rest of the time is for behind-the-scenes work: design (2-4 weeks), permitting (2-8 weeks), and final inspections (1-2 weeks). The permitting phase is often the longest part of the solar panel installation process, but we handle all the paperwork to ensure everything is done right.
Can I install solar panels myself?
While DIY installation is technically possible, we strongly advise against it. Solar installation involves high-voltage electricity, working at heights, and complex building codes. A mistake can be dangerous and costly. Professional installation ensures safety, code compliance, and warranty validity. A certified team has the training to handle all structural and electrical requirements correctly. For peace of mind and a system that works perfectly from day one, hiring a professional for solar panel installation is the smartest choice.
How does weather affect solar panel efficiency?
Solar panels are most efficient in direct sunlight but still produce power on cloudy days (10-25% of peak output). They generate electricity from light, not heat. In fact, extreme heat slightly reduces efficiency, while cool, sunny days are ideal. This is why proper airflow during installation is important. Modern panels are durable enough to handle San Diego’s weather, including rain, which helps keep them clean. Your system is designed to work reliably year-round, providing consistent clean energy.
Conclusion
From initial curiosity to understanding the details of the solar panel installation process, you now have the knowledge to invest in solar with confidence.
The process is straightforward with the right team. The phases—planning, design, permitting, installation, and activation—create a clear path toward energy independence.
In just two to three months, you can be generating your own clean energy. Your panels will work for you for 25+ years, saving you money daily and increasing your home’s value by an average of $15,000.
A smooth experience requires partnering with experienced professionals. Since 1996, West Coast Heating, Air Conditioning, and Solar has helped San Diego families make this transition. We handle the complexities like engineering and permitting, so you can focus on the savings.
Going solar is about more than just saving money. It’s about controlling your energy future, reducing your environmental impact, and gaining the peace of mind that comes from energy independence.
Every sunny day in San Diego is now an opportunity for savings. When the next power outage hits (especially if you’ve added battery storage), you’ll appreciate the foresight of this decision even more.
Ready to start your solar journey in San Diego? The process is easier than you think, and the rewards last for decades. Contact our expert solar panel company today! Let’s turn your roof into your personal power plant!